Wednesday, December 5, 2007

ALUI and Java Server Faces Portlet development - Part 2 (Continued)

In my previous ALUI JSF post ALUI and Java Server Faces Portlet development - Part 1, I talked about the problems you might encounter while using JSF and ALUI, and I also started to explain how to fix those problems. I will continue with that post...

Form Unique Id

It is standard (best) practice to make sure every ids and every javascript function names in a HTML page are unique. That way, Javascript functions are targetted correctly when called, and Javascript functions can effectively use "getElementById()" to access the right element within the portlet. When you are in a Portal environment, it is difficult to ensure that all the portlets on the page have unique ids. And thus it is possible to have a defective portlet when rendered with others on the same page, due to those kind of interferences (same element ids or same javascript function names). The probably of error reach 100% of chance if you put 2 portlets with identical content on the page.

Traditionally, with web applications where you have control over every elements and javascript function throughout the page (i.e. standard JSP), you would surely use the pt:common.namespace adaptive tag, in order to append to every JS functions and form ids the token string (i.e. $$PT_TOKEN$$)

But unfortunately, that won't work with JSF. Why is that?

First, quick reminder: It is important to note that "namespace" tag (like every ALUI Adaptive Tags) is transformed by the GATEWAY component. In other word, if you use the tag $$PT_TOKEN$$ throughout your JSF form, the remote JSF application DO see literally "$$PT_TOKEN$$", not the actual portlet IDs. When the portlet response goes through the gateway component, that is when the tag "$$PT_TOKEN$$" is changed on the fly with the real portlet id number.

Since JSF is a component oriented framework that generates the HTML markup, we don't have direct control over the HTML elements...and also, the element "name" (this is posted back to the server) is usually the same as the element "id". Thus, when you use:

<h:form id="editaddress_$$PT_TOKEN$$">
<h:inputText id="fullname" value="#{bean_backing.fullname}" />
</h:form>


You HTML markup for the response is:


<form id="editaddress_$$PT_TOKEN$$" ="">
<input id="editaddress_$$PT_TOKEN$$:fullname"
name="editaddress_$$PT_TOKEN$$:fullname" type="text" value="" />
<form>


And when you visualize the portlet source code (as rendered by the portal, where 289 is the portlet id that renders your web application), you get:


<form id="editaddress_289" ="">
<input id="editaddress_289:fullname"
name="editaddress_289:fullname" type="text" value="" />
<form>


So great, we do have unique HTML elements within each portlets, but you start to get the problem, right? Okay I am still going to explain :)


So the JSF component is waiting for a posted request attribute with literal name "street_$$PT_TOKEN$$", but actually, the posted attribute is "street_289"...and thus the JSF component cannot decode the posted value, and thus the form post won't work.


So the solution is to include the real portlet Id on the remote application side directly. I will use the same technique that I explained in the previous post: Custom renderer for the Form JSF component, overriding this time the base method "convertClientId(FacesContext context, String clientId)". Within the overridden method, I get the portlet id by simply using the IDK and then append the id to the component id.


@Override
    public String convertClientId(FacesContext context, String clientId) {
        IPortletContext ctx = PortletContextFactory.createPortletContext(
                (HttpServletRequest)context.getExternalContext().getRequest(),
                (HttpServletResponse)context.getExternalContext().getResponse()
                );
        IPortletRequest portletRequest = ctx.getRequest();
        //add the portlet id to the form
        if(portletRequest.isGatewayed())
            clientId += ctx.getRequest().getPortletID();
        return super.convertClientId(context, clientId);
    }


That's it!! That way, even if you let JSF generate the form element id, the "portlet id" WILL be appended if you are viewing the application through the portlet. And since the component is aware of the portlet id, the post will work fine. And finally, since the <h:form> is very often the top element of your JSF page, all the sub elements will also be unique since the form id is the prefix for all the children component ids.


Although you probably don't want to create a custom specific renderer for every components you want to use, this technique seems the best to me because it is completely non-intrusive within your JSF page...and thus, in the future, if BEA corrects all those JSF problems, you just disable the custom renderers and everything will work without any change.
Saturday, December 1, 2007

ALUI and Java Server Faces Portlet development - Part 1

Lately I have been looking into JSF and especially the Myfaces implementation as a development framework  for ALUI portlets, Similar to ASP.NET, I personally do think JSF is also an awesome and powerful framework to develop all sort of cool portlets and applications. But similar to ASP.NET portlets, JSF portlets have some problems when integrated in ALUI portal.

Mainly, the problems lie in the fact that those 2 frameworks are component oriented: We don't have a lot of control on the rendition of those control, and sometimes, the way they render is not fully compatible with the way ALUI portal behave:

  • Some urls in generated javascript are not always successfully gatewayed.
  • The portal does not enforce generated Html components to have unique IDs throughout the portal pages (i.e. 2 portlets on the same page can possibly have 2 form tags with same ids...which would very likely mess with the functionality of the portlets)
  • If you don't enable ALUI inline refresh, the portlets will go in the "Gateway" space (or the maximized state) on any navigation event. Although that can be useful in certain case, it won't to perform portlet-to-portlet communication (since the other portlets disappear in this maximized state).
  • If you DO enable inline refresh, you will hit other problems due to the fact that the Javascript layer added to the "inline-refresh" enabled portlet can interfere with the good behavior of some of the JSF/DOTNET components...

Ok...having painted such a "Dantesque" picture of the portlet development within ALUI portal, I now want to reassure you: Because ALUI is so extensible and powerful, all those problems can be resolved, and that's the goal of this post: Showing you some of the trick to make it all work.

For you DotNet users, you are in luck :) BEA introduced the "BEA AquaLogic .NET Application Accelerator" to offer a remedy to all the problems above. Since it is all there at http://www.bea.com/framework.jsp?CNT=index.htm&FP=/content/products/more/accelerator/ I won't talk to much about it.

But what about you poor JSF users? Well unfortunately for you (and I), we will have to get to work :)

But before getting to work, some of you might say: What about the "Java Portlet Tool" (http://dev2dev.bea.com/pub/a/2006/05/java-portlet-tools.html)? Well I looked at that quite thoroughly. I must admit that it is a pretty involved and clever piece of code...and it makes things work a little better on the JSF side. I especially do like the bean support for IDK functionality. Unfortunately, the following points are making me very hesitant and uneasy about this framework:

  • Unlike "BEA AquaLogic .NET Application Accelerator", the "Java Portlet Tool" (which is written by a BEA resource) is not supported by BEA. (Even though I could go with that - after all since the Java portlet tool code is provided, we could eventually support it ourselves - I would not recommend it to my clients who pay a lot of money to get support),
  • In addition to that, the java portlet tool, which rely on the modification of the pretty involved inline refresh jsxml javascript libraries (PTXML.js), seems to have been developed and tested with Plumtree 5.x, and does not seem to have been upgraded for 6.x versions of the portal. (thus, it might or might not work with 6.x versions)
  • Finally, the java portlet tool project has not been modified since 2006, which makes me think there are not a lot of people using it, or keeping it up-to-date.

Okay...so no supported portal framework for JSF...but still I want to use inline refresh...

Does it mean that I have to develop my JAVA portlets the way I use to develop them 5 years ago, without the popular frameworks out-there? Well I personally refuse to do that, and you should too :)

So it is time to have some fun finally!

JSF Navigation

A major problem I found with the ALUI inline refresh and JSF is that HTTP POSTs with JSF navigation is not working. JSF framework navigation (similarly to struts etc...) is controlled by the framework itself, based on the navigation rules you define in the JSF config file. (faces-config.xml). In other words, when the form is posted back to the server, the framework will deal with the navigation based on the action define on the command button that triggered the HTTP POST. Nothing unusual until now, and such a navigation behavior will work fine if you don't enable inline refresh...but the next page will be displayed in the maximized state we want to avoid.

When you enable inline refresh though, the ALUI portal will intercept the button submit action and perform its own submit action using its AJAX/Javascript framework (PTXML.js). On the html side, you will see:

<form id="viewaddress" name="viewaddress" onsubmit="pt_280.formRefresh(this); return false;" method="post"

action="http://localhost:7001/portal/server.pt/gateway/PTARGS_0_0_280_377_0_43/http%3B/localhost%3B7001/MyJSFDemo/viewAddress.jsf">


We can particularly notice how the submit is intercepted: the OnSubmit event handlers of the form tag does a "return false", which is the equivalent of saying: the submit button has never been clicked, the form has never been submitted. The "pt280.formRefresh(this);" is the statement that will post the form using an AJAX call. How this works is interesting: Using JavaScript to go through the DOM, the portal reconstructs the post request using all the input fields in the form (which would have been posted to the server). But the problem is: during that reconstruction, the <input type="button" /> and <input type="submit" /> are purposely left out. Although this usually makes sense in a standard web application (those buttons don't have a particular meaning on the server side, they are just useful to trigger a post back to the server), it does not make sense in the JSF world: the button name/value pair should be posted back to the server because the navigation rules won't happen otherwise. The result is that with inline refresh, navigation initiated by a form post is NOT working.


That is inconvenient...but we can correct that easily: if we create a hidden input field that has the same name and value as the button clicked, then this hidden field WILL be included in the posted request and the navigation will then work! Great! But you don't want to manually add yourself the hidden field in the form...for the simple reason that you want the value posted only when a particular button is clicked.


So the simple fix is to use javascript to dynamically add the input field in the form:


<pt:namespace pt:token="PORTLET_ID" xmlns:pt='http://www.plumtree.com/xmlschemas/ptui/' />

function setHiddenInputPORTLET_ID(form, name, value){
var newInput = document.createElement('input');
newInput.setAttribute('type','hidden');
newInput.setAttribute('name',name);
newInput.setAttribute('value',value);
form.appendChild(newInput);
}

<input id="viewaddress:_idJsp12" name="viewaddress:_idJsp12" type="submit" value="Change"

onclick="if(typeof window.oamSetHiddenInputPORTLET_ID!='undefined'){setHiddenInputPORTLET_ID(this.form,'viewaddress:_idJsp12','Change');}" />


That way, when you click the button, the equivalent hidden input is added to the form, which will then be effectively posted by the "pt280.formRefresh(this);" call. You noticed that I also use the ALUI adaptive tag to generate a unique token (portlet id) and thus make the JavaScript function "setHiddenInput" unique (that way, no interferences can occur if multiple portlets are on the same page)


In addition, you certainly don't want to force your developers to create that by hand for every buttons, (as well as introducing in your presentation code such a specific bug fix). So in order to be the least intrusive possible, I chose to customize a little bit the rendering of the <h:commandButton> element, which is the one responsible for postback and navigation:


<h:panelGroup>

<h:commandButton action="editaddress" value="Change"></h:commandButton>

</h:panelGroup>   


To do that, you just have to create a Class that extends the HtmlButtonRenderer class, and overrides 2 methods:


  • encodeEnd to generate the javascript function setHiddenInput281()


  • buildOnClick so add the call to the generated function setHiddenInput281()


That way, your JSF page are exactly the same...but the rendering of it is a little different when viewed through the portal. You can find the full custom renderer here.


That fix alone will take care of a good majority of the problems you would have had with using JSF and inline refresh inside ALUI. On a next post, I will show you how to deal with form ids when several JSF portlets are on the same page.


So long!

Saturday, November 17, 2007

BEA Aqualogic Portal (ALUI) - Single Sign On (SSO) Concerns and Techniques

As explained very well on this great post "Changing SSO Settings" from Function1, it is highly recommended to protect only the "SSOServlet" (default path= /portal/SSOServlet) when you want to SSO-enable the ALUI Portal. As I worked recently with an integration of ALUI with CA Siteminder, I am going to go a little bit further so that the SSO solution is complete.

But first, the 2 benefits of protecting only SSOServlet are:

  • Performance (as explained in Function1's post)
  • Enable guest access to the portal with same url (the portal is the gate, not the SSO agent)

But the main concerns are related to the SSO Session versus the Portal Session. As explained in Function1's post, the timeouts of portal and SSO agent should be in sync so that the user is actually logged out when the portal session times out (20 minutes by default). As it is well explained, you want both timeout to be very close, the portal timeout being trigged a bit before the SSO timeout.

But that's where I want to go just a little further...timeout sync is not enough to make the system perfect. Indeed, 2 extra use cases exist (and are not covered yet):

  1. SSO session "keep-alive"
  2. SSO session Logged out.

SSO session "keep-alive"

Basically, after the user successfully logged into ALUI portal (using SSO login screen), a SSO token has been created for its session (SSO cookie embedded in the browser session). But the problem is that after a successful login, the portal won't call SSOServlet again, and thus the SSO agent (generally on the web server front end, or the application server hosting the portal) has no longer anything to say about the traffic going through its agent since it is all unprotected from its point of view. Actually, it is as if the agent is not even seeing that traffic at all. Why do we care?? Well, the SSO session timeout is only refreshed if the agent is actually seeing any protected traffic. When the agent is not seeing any protected traffic, the timeout count down starts.

So to sum up, when the user successfully logged in the portal and is browsing the portal protected content, it is as if the session was idle from the Siteminder point of view. That is perfectly fine (at least you wont notice the problem) if you only use SSO for the portal. But imagine you use SSO for any other application in your enterprise (which is the use of SSO by the way :) ), or even portlets within your ALUI portal, then you probably don't want your SSO session to timeout while you are browsing the portal. Otherwise, after 20 or 30 minutes (whatever is set up on your SSO system for SSO timeout), you will still be able to browse the portal fine (since you are not idle from the portal point of view), but your SSO Session WILL HAVE TIMED OUT...and you will have to login again if you go to another of your favorite enterprise SSO protected sites...

So how can we make that work?? How can we ensure that the SSO session (or SSO token) is "kept alive" while we browse the portal?? Very simple trick actually: I basically created a dummy SSO protected content on the front end web server (for example http://portal.com/sec/dummy.html) and embedded that url in an invisible iframe in every portal pages (well suited for the footer portlet of your portal, or better, put that in your favorite liquidskin component - see my liquidskin ongoing serie "Overview of BEA ALUI LiquidSkin: Part 1" and "Overview of BEA ALUI LiquidSkin: Part 2")...

Basically, you have <iframe src="http://portal.com/sec/dummy.html" width="0" height="0"></iframe> at the bottom of every page you wish...it seems low tech, but works pretty well: every portal pages that have that footer portlet will initiate a request to that protected url, letting the SSO agent know: Hey, i am not idle, my session is still alive!!

Ok, good...but I am still not happy yet :)

SSO Log out

When you logout from the portal, you also want the SSO session to be logged out too. this is easy enough with CA siteminder: in the SSO policy you just provide the log out pattern to look for (usually something like /portal/server.pt?open=space&name=Login&control=Login&doLogout=&clearsession=true">/portal/server.pt?open=space&name=Login&control=Login&doLogout=&clearsession=true">/portal/server.pt?open=space&name=Login&control=Login&doLogout=&clearsession=true">http://<portal>/portal/server.pt?open=space&name=Login&control=Login&doLogout=&clearsession=true) and the SSO agent (remember it is on your front end web server or application server) will kill the SSO token if it intercept such a pattern in the request url. Cool!! That way, when you click log off in the portal, you are actually logged out.

But again, let's imagine we have multiple systems that uses the SSO session. You first loggedin the portal, browse it a little, and then decide to go to this other SSO-protected application. Then you decide you are finished and logout from there. What happens if you log out from another system apart from the portal?? Well if you don't do anything special, you will logoff from this other application, which will normally kill the SSO session (same "finding logout url pattern" technique)...but if you go back to the portal after that (and you were previously logged in)...oh surprise, you can go in no problem!! Well that's normal, your portal session is not over yet (provided that you were not away from the portal more than the portal timeout) and you did not do anything to finish it...

But that is not how it should work, right? If the SSO session is over (by logging off from any SSO protected system), you should not be able to go in any other SSO protected system!! Just imagine if your favorite banking web site was working this way...you logoff from your savings account, but your checking account interface is not logged off...I would not particularly like that from a security point of view :)

So we have to deal with it: I see 2 options in order to make sure all your systems are logging out when 1 is logging out:

  • Having an independent logout page that initiates logout requests for all the protected applications in your enterprise (for example an HTML page containing as many <img> tags or <iframe> tags as you have application to log out) -- I don't like this method so much because I will have to maintain this central logout page as soon as I add / remove a protected application in my environment,
  • Making applications log out on their own if the SSO token is not there. (or at least forcing any requests to SSO login if the SSO token is not present in the request)

The second solution is to me the best since it works once and for all. But it is a little more complex than the first one since we are protecting only the SSOServlet...(if the site was fully protected, that would work without doing anything...the agent would not see the SSO token and would not let you pass as long as you don't authenticate successfully)

How can we do that in the portal? I chose to implement a JAVA filter (I was working with JAVA portal with that client) that checks for SSO token presence (you can implement the same filter functionality in DOTNET too: it is called http module). The simplified logic is:

  • If SSO token is present and valid, do nothing,
  • Otherwise, force portal logout (if you actually previously logged in)...which will make the request being redirected to SSO login...

Et Voila! That way, the portal will logout nicely, on his own, when no SSO token is found.

I hope this helps you better understand the different concerns of implementing Single Sign On with your favorite ALUI portal (would actually apply to other portals too)

Saturday, November 3, 2007

How to Change ALUI Components Passwords

Each ALUI component requires Database information (host, schema, user, password, etc…) in order to interact with their respective Database.

When DBAs change the password of a database user (in some companies, it can actually happen pretty often) that is used by an Aqualogic User Interaction component, a similar “password change” procedure has to be done for each the concerned components’ configuration files.

If that was just it, that could be easy...but thanks to security, every passwords in the ALUI configuration files are encrypted...and thus, you need to encrypt the password too. But how do you encrypt those passwords? Where is the encryption utility?

ALUI provides several encryption mechanisms that you can apply to each component. I will try to walk you through what I call the encryption maze so that changing ALUI passwords becomes a breeze. (Note: files *.bat or *.cmd exist also in the unix/linux world...extension sh)

ALI Portal

DB Configuration File(s) path :

<PORTAL_HOME>\settings\common\serverconfig.xml

Encryption Utility path:

  • <PORTAL_HOME>\ptportal\<VERSION>\bin\ptconfig.exe (this utility will change the password directly in the serverconfig.xml file, OR
  • <PORTAL_HOME>\ptportal\<VERSION>\bin\cryptoutil.bat (must be executed in a shell or dos prompt -- provides the encrypted version of the text provided)

ALI publisher / Workflow

DB Configuration File(s) path:

  • <PORTAL_HOME>\ptcs\<VERSION>\settings\config\database.content.properties (publisher DB connection)
  • <PORTAL_HOME>\ptcs\<VERSION>\settings\config\database.portal.properties (portal DB connection)
  • <PORTAL_HOME>\ptworkflow\<VERSION>\settings\config\application.conf (workflow DB connection)

Encryption Utility path:

<PORTAL_HOME>\ptcs\<VERSION>\bin\native\pcsencrypt.cmd

Note: You can use that same utility to encrypt the publisher basic authentication user password too.

ALI Collaboration

DB Configuration File(s) path:

  • <PORTAL_HOME>\ptcollab\<VERSION>\settings\config\database.xml (collaboration DB connection)
  • <PORTAL_HOME>\ptnotification\<VERSION>\settings\config\database.xml (notification DB connection)

Encryption Utility path:

<PORTAL_HOME>\ptcollab\<VERSION>\bin\passwordChanger.bat

The utility passwordChanger.bat will change the password in both config file and database directly. This is very useful indeed, but what if the DBA only can change the password, or what if he already did change it...What now? Well another solution is available to you...you can use another encryption utility that works (weirdly): The publisher encryption utility <PORTAL_HOME>\ptcs\<VERSION>\bin\native\pcsencrypt.cmd

Note: You can use that same utility to encrypt the collaboration basic authentication user password too.

Studio

DB Configuration File(s) path:

  • <PORTAL_HOME>\ptstudio\<VERSION>\settings\config\PTStudioConfig.xml (studio and portal DB connections)

Encryption Utility path: No encryption utility is provided in the studio directory, so believe it or not...you guessed it...again the publisher encryption utility can be used for both studio and portal DB passwords.

<PORTAL_HOME>\ptcs\<VERSION>\bin\native\pcsencrypt.cmd

Analytics

  • <PORTAL_HOME>\ptanalytics\<VERSION>\settings\config\security\securityservice-config.xml (portal DB connection)
  • <PORTAL_HOME>\ptanalytics\<VERSION>\settings\config\hibernate.properties (analytics DB connection)
  • <PORTAL_HOME>\ptanalytics\<VERSION>\settings\config\configurator.properties (analytics, portal, collaboration and publisher DB connections)
  • <PORTAL_HOME>\ptanalytics\<VERSION>\settings\config\jobs.properties (portal, collaboration and publisher DB connections)

Encryption Utility path: Analytics provide a web configuration interface for changing DB connections and passwords in all the configuration files. But if you need to do it yourself without this web interface, again a solution exist: this time use the ... portal encryption for all the passwords!!

<PORTAL_HOME>\ptportal\<VERSION>\bin\cryptoutil.bat


That's all I got for now! Hope this helps to navigate in ALUI Password encryption hell! :)

Saturday, October 27, 2007

Overview of BEA ALUI LiquidSkin : Part 1

On one of my past project, I worked quite a bit with this (fairly) new BEA offering for BEA Aqualogic Interaction (ALUI) Portal: LiquidSkin. But what is it exactly?
Well, LiquidSkin is a pluggable component (or pluggable navigation in the ALUI jargon) that will transform your standard ALUI Portal Interface into a web-like easy-to-use easy-to-update interface.
LiquidSkin can be installed on any G6 portal (6.0, 6.1, 6.1 MP1) and supports rapid development of custom pluggable navigations.
It is important to note that this component DOES NOT come free with your portal purchase(inquire with BEA in regards of the pricing), but once bought, it includes installation/training by a BEA professionnal, as well as fairly good support.

All in all, I've been quite impressed with this component and want to give an overview of the great features that it provides to your ALUI portal.

First what is an ALUI pluggable navigation?

The pluggable navigations are ALUI software components that create the content around the portlets in your portal (for example links to mypages, my home, my communities, mandatory communities, my account, help, etc...)

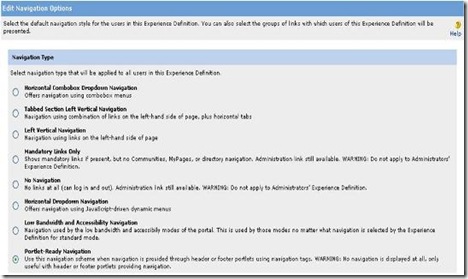
By default, ALUI provides a couple of standard navigation options: 

NavigationOptions

Even though you can already do good things with those out-of-the-box navigations, it does not offer you a great flexibility. Indeed, if you want to customize you navigation (i.e. putting an extra link somewhere outside of your portlets), you will go through a great deal of code...(unless you are a real ALUI guru of course)

So what does LiquidSkin give me??

LiquidSkin fills that gap by offering a pluggable navigation "on steroid", with a long list of navigational components that you can use easily in order to build the ALUI interface of your dream :)

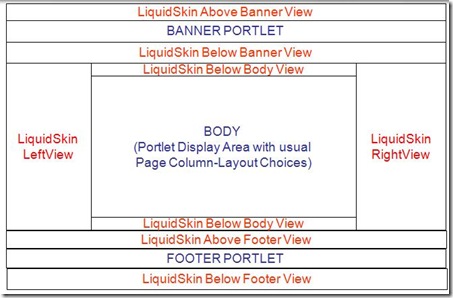
To give you a better idea of what LiquidSkin gives you, here are the parts of the screen that are the responsability of LiquidSkin (and thus that you can customize easily) 

LiquidSkinAreas

List of Interesting features

I dont want to sound too marketing (I am neither a BEA employee, nor have shares in the company :)), but below is a list of the feature that I most appreciate in LiquidSkin:

  • Complete configurable Pluggable Navigations that allows rapid development of custom navigations.
  • Construct and deploy custom navigations by modifying simple XML configuration files.
  • Only skills required: HTML (table-less) and CSS. No Coding!!
  • Each skin tied to an experience definition: provide multiple intranet or .com-like navigation experiences within 1 portal.
  • The navigation is available in both .Net and Java versions, and it is easy to install (15-30 minutes)
  • Both the code and the configuration options are well documented, and there are multiple configuration examples.
  • No Portal Restart when modifying or installing a new skin.
  • Skin loader: Configurable schedule.
  • Easy deployment from development to production: Copy only folders, images and xml documents (no compilation of code needed)
  • Make it easy to internationalize your nav customizations.
  • Optimize performance by selectively caching components output.
  • Hide page display for communities with page name starting with specified word.
  • Styles possibly targeted to different browsers
  • Etc...(you will see for yourself when you start working with it)

A couple of components you might like

Top Nav and Breadcrumb 

Breadcrumb

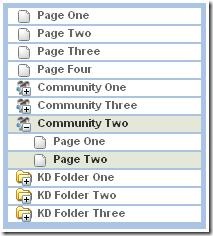
Left Navigation 

LeftNavigation

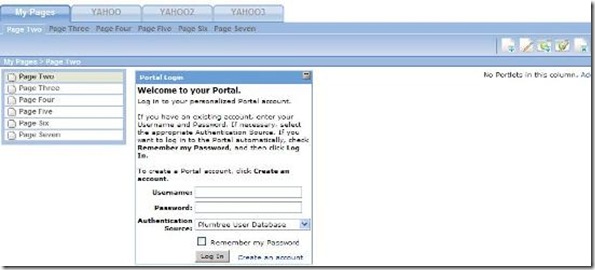
All together 

AllComponents

On this last one, we can see one portlet on the page (Portal Login) and the rest is displayed by LiquidSkin (Top DHTML Nav, Top Sub Nav for pages and subcommunities, Left Nav, and buttons for quick functionnality access)

What's under the hood?

I spared you the technical part ... until now. But dont worry, it is not that complex. Basically, to add component to a view, or edit component properties, or delete components from a view, you have to edit the "LiquidSkin.xml" that is located in your image server, within the LiquidSkin folder (ptimages\imageserver\plumtree\portal\custom\LiquidSkin\<your liquid skin name>\)

After you edited that file, the Liquid Skin timer task that runs every X seconds (you specify the reload interval in the same Liquidskin.xml file) will reload the file in the portal memory, which will make your changes visible on the screen.

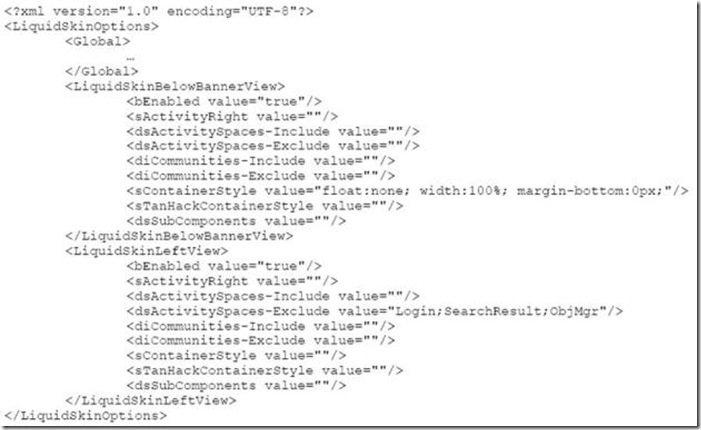
To give you a basic idea, this Liquidskin.xml configuration file is similar to the following: 

LiquidSkinXml

As you can see, nothing fancy: Just a well formatted XML that contains all the views you want to use, all the components that you want to add in each view, and all the parameters for each components...

But how do I link my portal experience to the liquidskin??

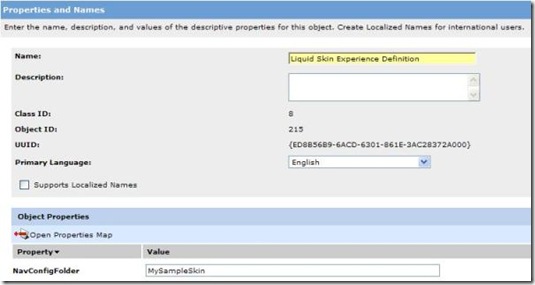
You just have to specify in the property attached to your portal experience definition the name of the LiquidSkin you are developping. (see below). This name will correspond to the liquid skin that is one your image server, at the foloowing path: ptimages\imageserver\plumtree\portal\custom\LiquidSkin\<your liquid skin name>\LiquidSkin.xml 

ExpDefinition

Final Words

Even though this component offers great flexibility and a fairly long number of components to use, the real challenge will be to build the LiquidSkin.xml file, which requires a good knowledge of all the components available to you (and how they works), as well as a fairly good understanding of tableless HTML (every thing is DIV-based) and Cascading Style Sheets. Nothing hard for a seasoned web-designer :)

So long...see you next time to talk about how easy it is to install that component!

Friday, October 26, 2007

Overview of BEA ALUI LiquidSkin: Part 2

In my previous post "Overview of BEA ALUI Liquidskin", I talked about the great features that this offering provides. Now I want to talk about the installation of the component.

But first, I might not have been clear on my previous post: The LiquidSkin engine is running on the portal server, NOT on the image server. On the ALUI image server(s), you will find the different configuration files (all called LiquidSkin.xml in their own folder) that contains the settings for each skin in the various portal experience definitions. The xml files on the image server are of course not accessed every time a page is displayed, but loaded in the portal memory at specific intervals (very similar to Varpacks loading for those of you who are familiar with Varpacks).

LiquidSkin comes in 2 flavors: .NET or Java (like the portal). Depending on the portal you are running, you will chose the appropriate version.

For .NET, those are:

  • LiquidSkin.dll (core LiquidSkin code that contains the base classes and the  various utility classes)
  • LiquidSkinComponents.dll (contains the majority of Liquidskin components, i.e. LeftNavigation, Breadcrumb, Links, etc... Each of those components extends a base class defined in the core LiquidSkin.dll)
  • LiquidSkinImpersonate.dll (optional component -for security purpose- that allows an administrator to impersonate any user in the portal. When activated, the administrator is logged in the portal as that user.)
  • LiquidSkinFilteredCommunities.dll (optional component that creates a list of "My Community" links which are filtered to include and/or exclude certain 'types' of communities. A community 'type' is defined by a combination of property values associated with the community. Note: Expensive process. Enable Caching.)

For Java, you just replace dll with jar for the names.

Installation Steps:

It is said in the documentation that it should not take more than 30 minutes to install Liquidskin. This is TRUE!

  • Stopping/Starting portal server(s)
  • Copying a the jar/dll files to each portal server
  • Editing the CustomActivitySpaces.xml and portalconfig.xml files on each portal server
  • Copying the skin folders to each image server
  • Importing a .pte file to create the custom properties used by LiquidSkin

Jar / Dll Installation

In order to install those jars / dlls in your portal, you just need to put them in the library folders of the portal installation, as well as in the portal web application itself.

Thus, you need to copy them in <pt_home>/ptportal/6.0/lib

And in the portal web application (method differs slightly between .NET and Java)

For .NET, it is easy since the portal application is not packaged in an archive, as it is for java. Thus, you just need to copy all the dlls in the <pt_home>/ptportal/6.0/webapp/portal/web/bin folder.

For Java, you will need to explode the portal.war and copy the LiquidSkin Jars in the newly exploded folder WEB-INF\lib\. Then, just repackage the portal.war and update the portal.ear.

Little Reminder for Jar operations:

  • Exploding the war: jar -xvf portal.war
  • Repacking the new war: jar -cvf portal.war * (to be done at the root of what you want to package)
  • Update the ear: jar -uvf portal.ear portal.war

Portal Configuration

To enable the LiquidSkin pluggable navigation, you must edit the "<PORTAL_HOME>\settings\portal\CustomActivitySpaces.xml" file and add in it the LiquidSkin libraries:

<AppLibFiles>
<libfile name="LiquidSkin"/>
<libfile name="LiquidSkinComponents"/>
</AppLibFiles>

Portal Object Import

You must import the PTE package that contains 2 properties:

  • "NavConfigFolder" property: This is attached (Global Object Property Map) to experience definition objects. You will save in that property the name of the liquidskin that corresponds to the experience definition you want "LiquidSkin enabled"
  • "Subcommunity Display Order" is attached (Global Object Property Map) to the community objects. This is to allow custom sorting of communities within the Top or Left navigation components.

Optional: Modify margins and view width

As any other portal navigation. it is possible to change margins and view width in the PortalConfig.xml (section "portal:Navigation"). The only thing you need to know is that the the id of the LiquidSkin navigation framework is 71. This ID is to be appended to the navigation properties so that you can get for example a specific left navigation column width.

Finally, restart the web application server that host the portal. DONE!! In 18min 32 seconds!! See I did not lie :)