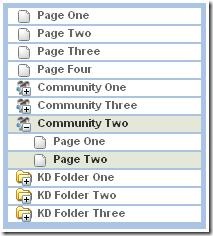
On one of my past project, I worked quite a bit with this (fairly) new BEA offering for BEA Aqualogic Interaction (ALUI) Portal: LiquidSkin. But what is it exactly?
Well, LiquidSkin is a pluggable component (or pluggable navigation in the ALUI jargon) that will transform your standard ALUI Portal Interface into a web-like easy-to-use easy-to-update interface.
LiquidSkin can be installed on any G6 portal (6.0, 6.1, 6.1 MP1) and supports rapid development of custom pluggable navigations.
It is important to note that this component DOES NOT come free with your portal purchase(inquire with BEA in regards of the pricing), but once bought, it includes installation/training by a BEA professionnal, as well as fairly good support.
All in all, I've been quite impressed with this component and want to give an overview of the great features that it provides to your ALUI portal.
First what is an ALUI pluggable navigation?
The pluggable navigations are ALUI software components that create the content around the portlets in your portal (for example links to mypages, my home, my communities, mandatory communities, my account, help, etc...)
By default, ALUI provides a couple of standard navigation options:
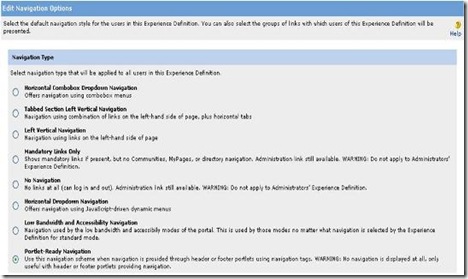
Even though you can already do good things with those out-of-the-box navigations, it does not offer you a great flexibility. Indeed, if you want to customize you navigation (i.e. putting an extra link somewhere outside of your portlets), you will go through a great deal of code...(unless you are a real ALUI guru of course)
So what does LiquidSkin give me??
LiquidSkin fills that gap by offering a pluggable navigation "on steroid", with a long list of navigational components that you can use easily in order to build the ALUI interface of your dream :)
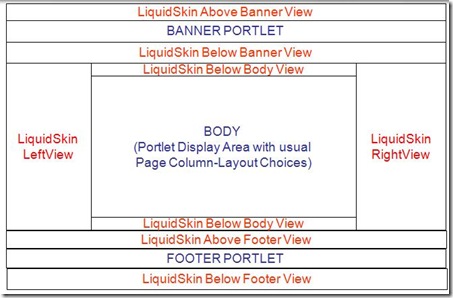
To give you a better idea of what LiquidSkin gives you, here are the parts of the screen that are the responsability of LiquidSkin (and thus that you can customize easily)
List of Interesting features
I dont want to sound too marketing (I am neither a BEA employee, nor have shares in the company :)), but below is a list of the feature that I most appreciate in LiquidSkin:
- Complete configurable Pluggable Navigations that allows rapid development of custom navigations.
- Construct and deploy custom navigations by modifying simple XML configuration files.
- Only skills required: HTML (table-less) and CSS. No Coding!!
- Each skin tied to an experience definition: provide multiple intranet or .com-like navigation experiences within 1 portal.
- The navigation is available in both .Net and Java versions, and it is easy to install (15-30 minutes)
- Both the code and the configuration options are well documented, and there are multiple configuration examples.
- No Portal Restart when modifying or installing a new skin.
- Skin loader: Configurable schedule.
- Easy deployment from development to production: Copy only folders, images and xml documents (no compilation of code needed)
- Make it easy to internationalize your nav customizations.
- Optimize performance by selectively caching components output.
- Hide page display for communities with page name starting with specified word.
- Styles possibly targeted to different browsers
- Etc...(you will see for yourself when you start working with it)
A couple of components you might like
All together
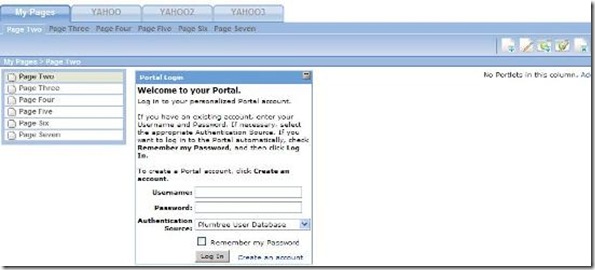
On this last one, we can see one portlet on the page (Portal Login) and the rest is displayed by LiquidSkin (Top DHTML Nav, Top Sub Nav for pages and subcommunities, Left Nav, and buttons for quick functionnality access)
What's under the hood?
I spared you the technical part ... until now. But dont worry, it is not that complex. Basically, to add component to a view, or edit component properties, or delete components from a view, you have to edit the "LiquidSkin.xml" that is located in your image server, within the LiquidSkin folder (ptimages\imageserver\plumtree\portal\custom\LiquidSkin\<your liquid skin name>\)
After you edited that file, the Liquid Skin timer task that runs every X seconds (you specify the reload interval in the same Liquidskin.xml file) will reload the file in the portal memory, which will make your changes visible on the screen.
To give you a basic idea, this Liquidskin.xml configuration file is similar to the following:
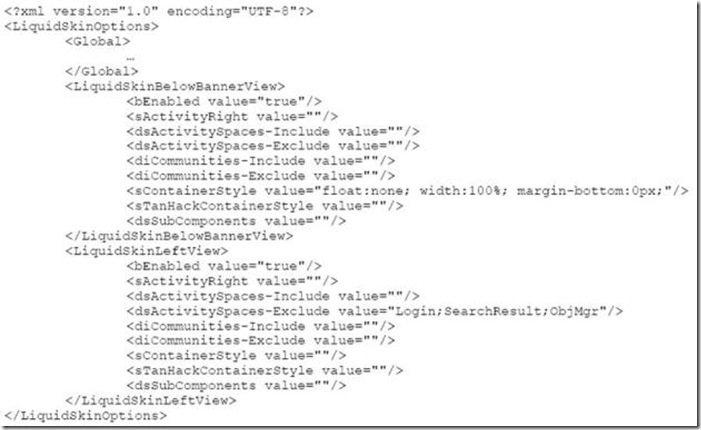
As you can see, nothing fancy: Just a well formatted XML that contains all the views you want to use, all the components that you want to add in each view, and all the parameters for each components...
But how do I link my portal experience to the liquidskin??
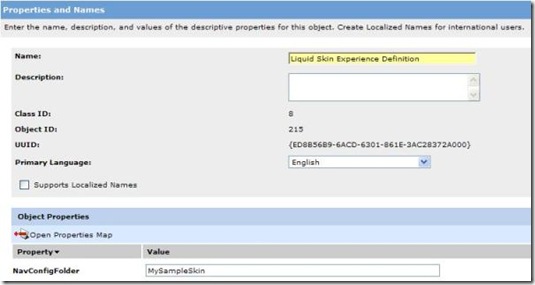
You just have to specify in the property attached to your portal experience definition the name of the LiquidSkin you are developping. (see below). This name will correspond to the liquid skin that is one your image server, at the foloowing path: ptimages\imageserver\plumtree\portal\custom\LiquidSkin\<your liquid skin name>\LiquidSkin.xml
Final Words
Even though this component offers great flexibility and a fairly long number of components to use, the real challenge will be to build the LiquidSkin.xml file, which requires a good knowledge of all the components available to you (and how they works), as well as a fairly good understanding of tableless HTML (every thing is DIV-based) and Cascading Style Sheets. Nothing hard for a seasoned web-designer :)
So long...see you next time to talk about how easy it is to install that component!

